SpicePOS User Guide

SpicePOS User Guide

  • Help
  • SpicePOS
  • Login

›Hardware Setup

Getting Started

  • Before You Start
  • Download and start POS App
  • Sign Up
  • Sign In
  • Setting up Company Profile
  • Your First Sale

    • Setting Up a Few Items
    • Entering Your First Sale
    • Revisiting First Receipt
    • Clear Test Data to Start Afresh

    Software Walkthrough

    • App Walkthrough
    • Back-Office Walkthrough
    • General Features of a Back-Office View

Concepts

  • How SpicePOS Works
  • Working Offline
  • Data Retention Period
  • Company and Branches
  • Items, Categories & Item Groups
  • Discounts
  • Permissions, Roles & Users
  • Customers & Territories
  • Suppliers
  • Inventory Management
  • Settings
  • Employee Shifts & Day Cycle
  • Reports

Hardware

  • Hardware Requirements
  • Network Requirements
  • Hardware Setup

    • Setup Ethernet Printers
    • Connect USB/Bluetooth Printers
    • Connect Cash Drawers
    • Connect Barcode Scanners
    • Connect Barcode Printers

Users

    Setting up Users in SpicePOS

    • Roles & Permissions Setup
    • Users Setup
    • Actions on Users

    User Activities in POS and Back-Office

    • Sign In to SpicePOS
    • Sign Out of SpicePOS
    • Change User in POS
    • Change Password Option
    • Forgot Password (Owner Password) Option

Items

    Data Setup through App

    • Setup Categories through App
    • Setup Items through App

    Data Setup through Back-Office

    • Setup Categories through Back-Office
    • Categories File Upload
    • Setup Items through Back-Office
    • Items File Upload
    • Upload Images in Bulk
    • Items Quick Edit
    • Setup Additions
    • Setup Item Groups
    • Setup Discounts

Settings

    Back-Office Settings

    • Back-Office Settings Hierarchy
    • General Settings Back-Office
    • Service Charge & Tax Settings
    • Receipt Printing Settings
    • Payment Method Settings
    • Delivery Method Settings
    • Restaurant Specific Settings
    • KOT/BOT Printing Settings
    • Summary Print Settings

    POS App Settings

    • App Level Settings
    • General Settings in App

Sales

    Order Taking

    • Add Items to a New Order
    • Remove Items from a New Order
    • Locating Items in POS App
    • Working with Item Additions
    • Clear New Order
    • Giving Manual Discounts
    • Change Item Price at Sale
    • Save Order
    • Charge Order

    Ongoing Orders

    • Ongoing Orders View
    • Edit Ongoing Order
    • Void Items from Ongoing Order
    • Charge Ongoing Order
    • Void Ongoing Order
    • Copy Order to New Order
    • Send Kitchen/Bar Command
    • Split Order
    • Print KOT/BOT
    • Print Pre Receipt
    • Table Occupancy

    Billing

    • Payment Flow
    • Accepting Cash Payments
    • Accepting Card Payments
    • Accepting Customer Credit Payments
    • Accepting Customer Check Payments
    • Complementary Payments
    • Billing to Rooms
    • Accepting Custom Payment Methods
    • Split Payments
    • Delivery Methods
    • View Receipts
    • Copy Receipt to New Order
    • Refund Receipt
    • Void Receipt
    • Reprint from Receipt
    • Goods Return
    • Room Bills

    Sales Reports

    • Analytics Dashboard
    • Receipts Report
    • Sales Reports
    • Customer Payments Report
    • KOT/BOT Report
    • Goods Return Report
    • Room Bills Report

Shifts & Day Cycle

  • Day Cycle with & without Shifts
  • Shifts

    • Starting a Shift
    • View an Ongoing Shift
    • Closing a Shift
    • Recent Shifts History
    • Shifts Report in Back-Office

    PayIn/PayOut

    • PayIn/PayOut Screen
    • Add PayIn/PayOut
    • Delete PayIn/PayOuts
    • PayIn/PayOut in Back-Office
  • Printing Day Summary
  • Income/Expenses View

Customers

    Customer & Territories Setup

    • Setup Customers from App
    • Search Customers in App
    • Blacklist a Customer
    • Removing a Customer from Blacklist
    • Setup Customers from Back-Office
    • Customers File Upload
    • Setup Territories

    Customer Credit & Credit Settlement

    • Check Customer Credit from App
    • Settle Customer Credit
    • Customer Credit Reports

    Customer Cheques & Cheque Settlement

    • Customer Cheques View
    • Customer Cheque Lifecycle

    Customer Deposits

    • Accept Customer Deposit
    • Refunding Customer Deposit
  • Customer Dashboard

Suppliers

    Setup Suppliers

    • Setup Suppliers
    • Supplier File Upload

    Supplier Cheques & Cheque Settlement

    • Supplier Cheques View
    • Supplier Cheque Lifecycle
    • Issuing a Replacement Cheque

Inventory

    Manage Inventory from App

    • View Inventory from App
    • Print Inventory Snapshot
    • Add Inventory through App
    • Deduct Inventory through App
    • Print Labels in Bulk

    Manage Inventory from Back-Office

    • Inventory Snapshot Report
    • Inventory Movement Report
    • Inventory Transaction History
    • Individual Inventory Actions
    • Inventory File Upload

    Purchase Orders

    • Create Purchase Order
    • Actions on Purchase Orders

    Supplier Bills (GRN)

    • Create GRN
    • Actions on GRNs

    Stock Issuances (Transfers)

    • Create Stock Issuance
    • Actions on Stock Issuances

    Stock Takes

    • Add Stock Take
    • Actions on Stock Takes

    Supplier Returns

    • Create Stock Return
    • Actions on Supplier Returns

Setup Ethernet Printers

Add an Ethernet Printer

Network (ethernet) POS printers are configured in the back-office. Such printers defined in the back-office can be assigned for order or receipt printing of a particular branch. Once a network printer is assigned as an order or receipt printer to a branch, all the POS terminals registered for the branch can print through that printer.

Printer selection can be found at,

Back-Office -> Side Nav -> Settings -> Receipt Printing
or
Back-Office -> Side Nav -> Settings -> KOT/BOT Printing (Restaurant Specific)

Back-Office Screenshot

Back-Office Screenshot

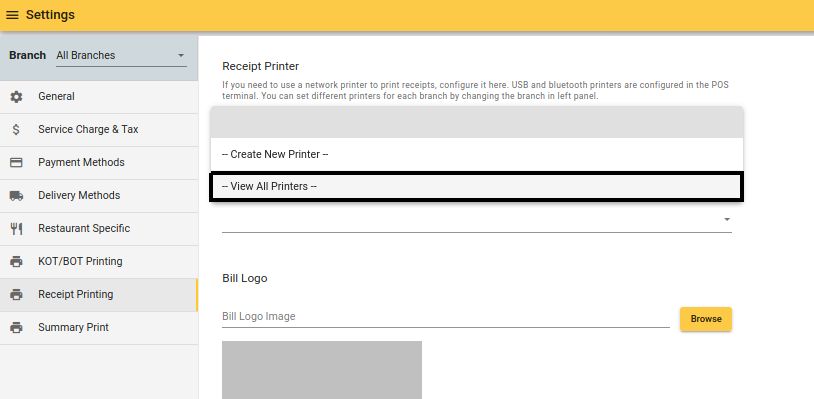
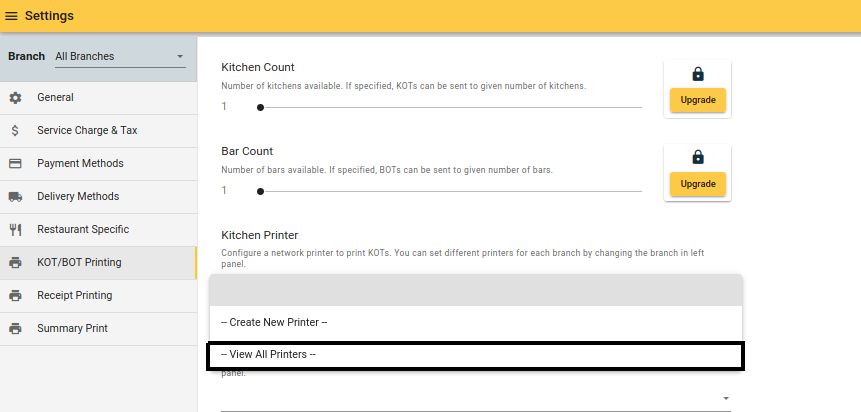
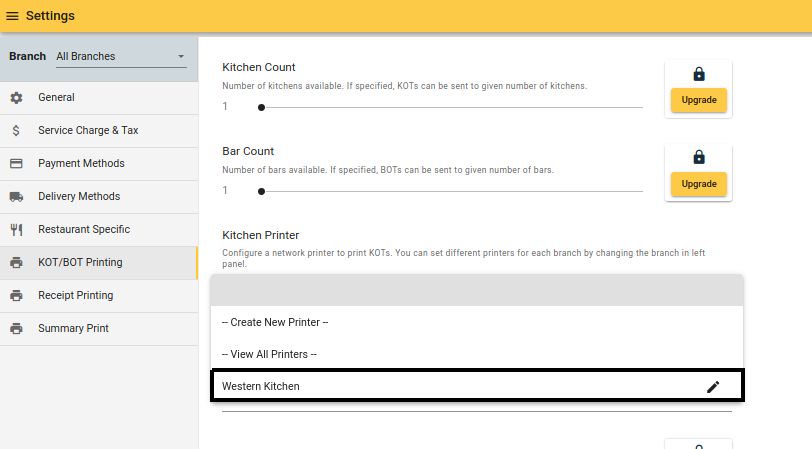
Select "View All Printers" from printer selection dropdown to view printers screen.

Proceed to printers screen:

Back-Office Screenshot

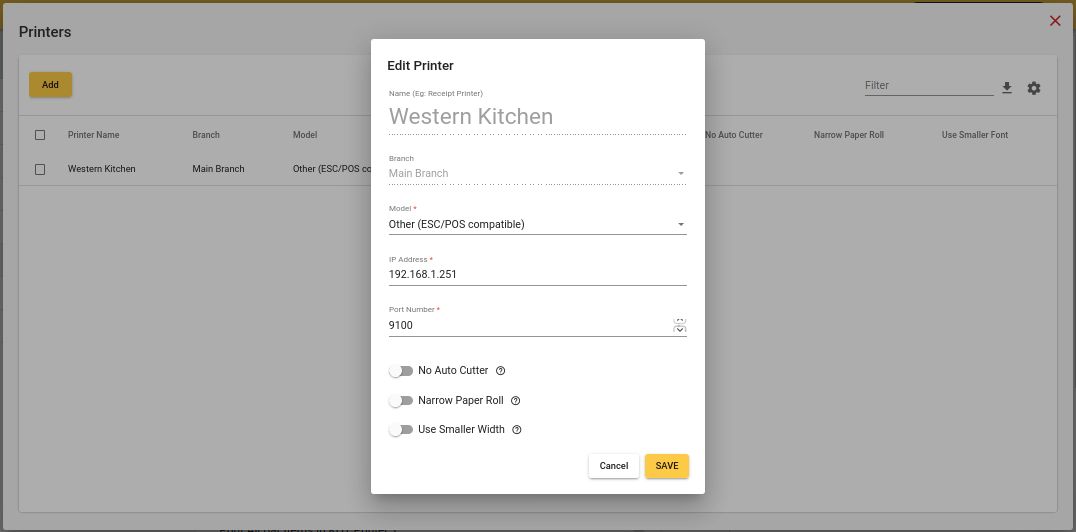
To add a Network printer,

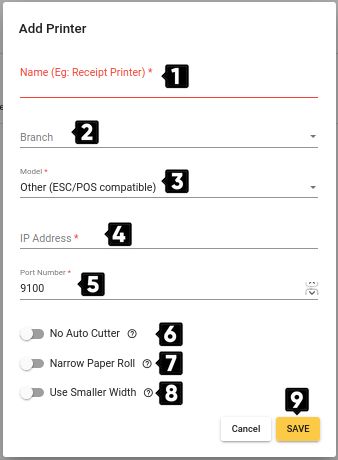
Printers Screen -> Click the "Add" button -> Fill in details -> Confirm Action

Screen numbered:

Back-Office Screenshot

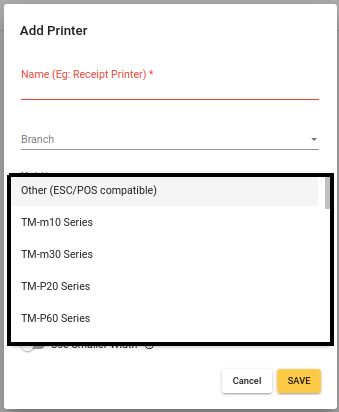
Printer models available:

Back-Office Screenshot

NumberField NameDescription
1Printer station nameA name assigned to the network printer definition for it to be identified when attaching to a branch later.
2BranchBranch to which this printer would be attached to.
3Printer ModelSpicePOS supports EPSON POS printers and other printers which support ESC/POS printing mechanism. If the printer here is an EPSON primer model, the relevant model can be chosen from the list. Otherwise, “other (ESC/POS compatible) option can be selected.
4IP addressLocal IP address assigned to the POS printer. But it’s recommended to check in printer user’s manual or printer configuration web-page. Please check below section “assigning a static IP to a network printer” to find how the port of a network printer can be assigned.
5PortShould only be specified for the option “Other (ESC/POS compatible)”. Usually this is 9100. But it’s recommended to check in printer user’s manual or printer configuration web-page. Please check below section “assigning a static IP to a network printer” to find how to access printer configurations page.
6No Auto CutterSwitch on/off auto paper cutter in the POS printer. Should be disabled if paper should not cut automatically or the printer does not support an auto cutter.
7Narrow paper rollFor 2” (58mm) POS printers
8Use smaller widthTo be enabled if the printer model is an EPSON dot matrix POS printer.
9SaveConfirm printer creation so that the printer will be created in the system.

Attach Ethernet Printer to a Branch as a Receipt Printer or an Order Printer

Once network printers are defined, they can be attached to the branch by selecting it from Back-Office settings.

Back-Office Screenshot

Assigning Static IP Address to an Ethernet Printer

POS printers can be assigned a static IP address or enable DHCP so that the IP address is automatically assigned. Using a static IP address is the only option recommended for SpicePOS since the IP Address is saved in back-office printer configurations.

Assigning a static IP address to a POS Printer can be done following the below steps,

  • Take a test print from the POS printer

  • Locate the current IP address in the test print

  • Connect POS printer through a patch cable to a computer

  • Assign an IP address to the computer so that it is in the same local IP range as the POS printer (Inside the same subnet)

    Ex: If the printer IP address is 192.168.192.168, then the Computer IP address can be 192.168.192.101

  • Open a web browser, type in POS printer’s IP address as read from the test print

  • Now you’ll be shown the printer configurations page.

  • Change static IP address, subnet, default gateway IP address.

  • Change any other configurations if required.

  • Save and estart printer (printer may automatically restart once changes saved)

For more details, please refer to printer user’s manual.

Troubleshooting Network Printer Connectivity

A test print can be taken to ensure the network printer is successfully added to the system. If a test print does not work,

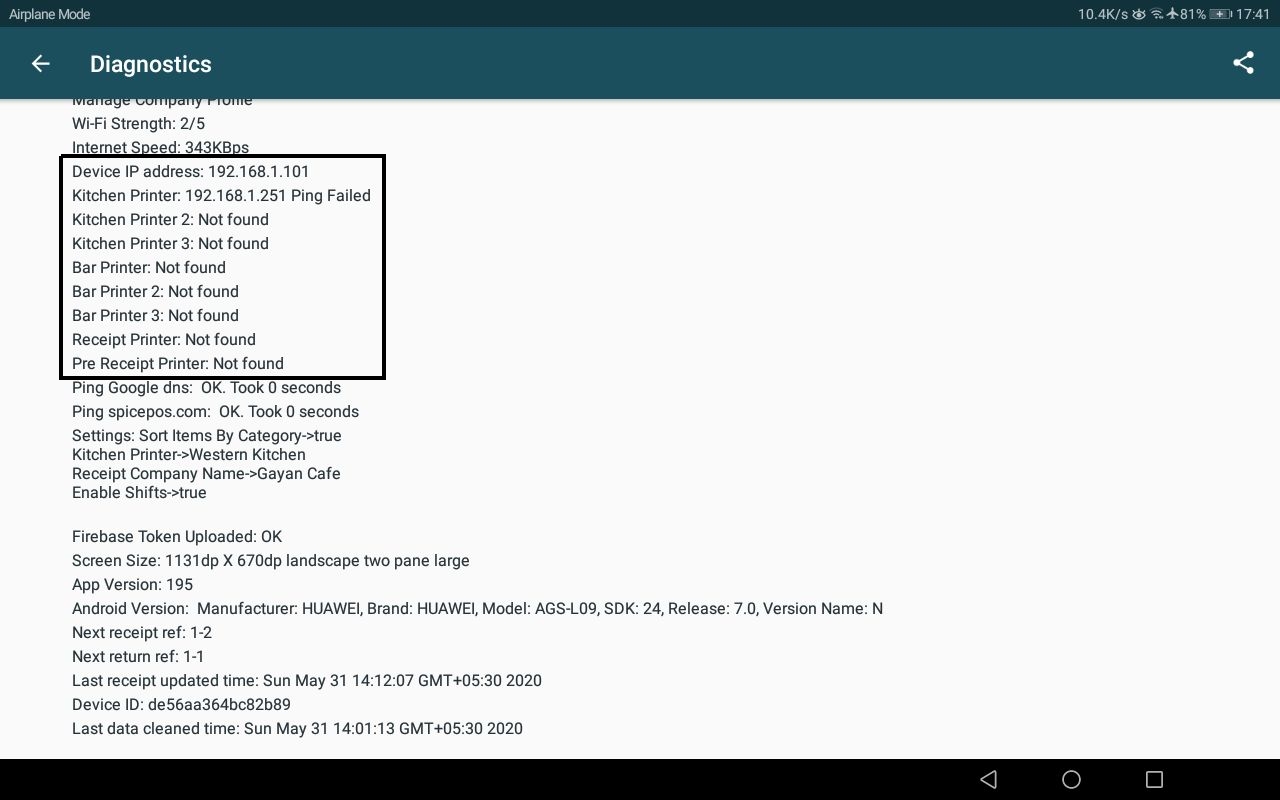
Go to POS App -> Settings -> Diagnostics

And find the diagnostic line related to the IP address of the printer. If there is no connectivity issue there should be “ok” in front of printer IP.

Locate diagnostics in settings:

App Screenshot

Locate printer IP address:

App Screenshot

Edit a Printer Entry

Printers Screen -> Click on the Printer row in the List -> Perform Edit -> Save

Back-Office Screenshot

Delete an Printer Entry

Printers Screen -> Select Printer from left hand side checkbox -> Select the Delete option from the icons at right hand side top -> Confirm Delete

Back-Office Screenshot

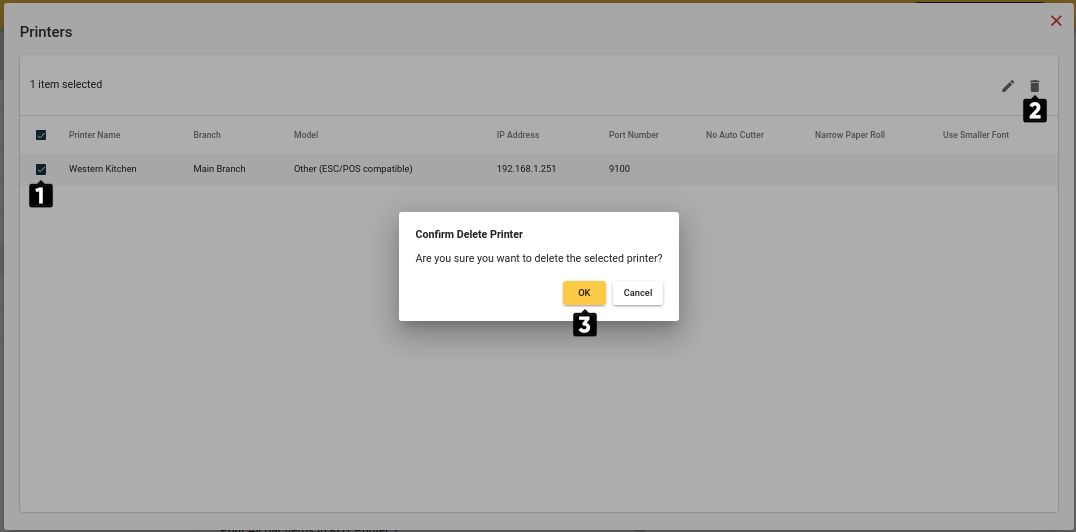
Note: Upon deleting a printer, it will be dettached from all settings. Such settings which had the deleted printer set will be changed to blank selection.

← Network RequirementsConnect USB/Bluetooth Printers →
  • Add an Ethernet Printer
  • Attach Ethernet Printer to a Branch as a Receipt Printer or an Order Printer
  • Assigning Static IP Address to an Ethernet Printer
  • Troubleshooting Network Printer Connectivity
  • Edit a Printer Entry
  • Delete an Printer Entry
SpicePOS User Guide

Links

www.spicepos.com
Back-Office

Follow Us

Facebook
Instagram
Copyright © 2021 SpicePOS