SpicePOS User Guide

SpicePOS User Guide

  • Help
  • SpicePOS
  • Login

›Manage Inventory from Back-Office

Getting Started

  • Before You Start
  • Download and start POS App
  • Sign Up
  • Sign In
  • Setting up Company Profile
  • Your First Sale

    • Setting Up a Few Items
    • Entering Your First Sale
    • Revisiting First Receipt
    • Clear Test Data to Start Afresh

    Software Walkthrough

    • App Walkthrough
    • Back-Office Walkthrough
    • General Features of a Back-Office View

Concepts

  • How SpicePOS Works
  • Working Offline
  • Data Retention Period
  • Company and Branches
  • Items, Categories & Item Groups
  • Discounts
  • Permissions, Roles & Users
  • Customers & Territories
  • Suppliers
  • Inventory Management
  • Settings
  • Employee Shifts & Day Cycle
  • Reports

Hardware

  • Hardware Requirements
  • Network Requirements
  • Hardware Setup

    • Setup Ethernet Printers
    • Connect USB/Bluetooth Printers
    • Connect Cash Drawers
    • Connect Barcode Scanners
    • Connect Barcode Printers

Users

    Setting up Users in SpicePOS

    • Roles & Permissions Setup
    • Users Setup
    • Actions on Users

    User Activities in POS and Back-Office

    • Sign In to SpicePOS
    • Sign Out of SpicePOS
    • Change User in POS
    • Change Password Option
    • Forgot Password (Owner Password) Option

Items

    Data Setup through App

    • Setup Categories through App
    • Setup Items through App

    Data Setup through Back-Office

    • Setup Categories through Back-Office
    • Categories File Upload
    • Setup Items through Back-Office
    • Items File Upload
    • Upload Images in Bulk
    • Items Quick Edit
    • Setup Additions
    • Setup Item Groups
    • Setup Discounts

Settings

    Back-Office Settings

    • Back-Office Settings Hierarchy
    • General Settings Back-Office
    • Service Charge & Tax Settings
    • Receipt Printing Settings
    • Payment Method Settings
    • Delivery Method Settings
    • Restaurant Specific Settings
    • KOT/BOT Printing Settings
    • Summary Print Settings

    POS App Settings

    • App Level Settings
    • General Settings in App

Sales

    Order Taking

    • Add Items to a New Order
    • Remove Items from a New Order
    • Locating Items in POS App
    • Working with Item Additions
    • Clear New Order
    • Giving Manual Discounts
    • Change Item Price at Sale
    • Save Order
    • Charge Order

    Ongoing Orders

    • Ongoing Orders View
    • Edit Ongoing Order
    • Void Items from Ongoing Order
    • Charge Ongoing Order
    • Void Ongoing Order
    • Copy Order to New Order
    • Send Kitchen/Bar Command
    • Split Order
    • Print KOT/BOT
    • Print Pre Receipt
    • Table Occupancy

    Billing

    • Payment Flow
    • Accepting Cash Payments
    • Accepting Card Payments
    • Accepting Customer Credit Payments
    • Accepting Customer Check Payments
    • Complementary Payments
    • Billing to Rooms
    • Accepting Custom Payment Methods
    • Split Payments
    • Delivery Methods
    • View Receipts
    • Copy Receipt to New Order
    • Refund Receipt
    • Void Receipt
    • Reprint from Receipt
    • Goods Return
    • Room Bills

    Sales Reports

    • Analytics Dashboard
    • Receipts Report
    • Sales Reports
    • Customer Payments Report
    • KOT/BOT Report
    • Goods Return Report
    • Room Bills Report

Shifts & Day Cycle

  • Day Cycle with & without Shifts
  • Shifts

    • Starting a Shift
    • View an Ongoing Shift
    • Closing a Shift
    • Recent Shifts History
    • Shifts Report in Back-Office

    PayIn/PayOut

    • PayIn/PayOut Screen
    • Add PayIn/PayOut
    • Delete PayIn/PayOuts
    • PayIn/PayOut in Back-Office
  • Printing Day Summary
  • Income/Expenses View

Customers

    Customer & Territories Setup

    • Setup Customers from App
    • Search Customers in App
    • Blacklist a Customer
    • Removing a Customer from Blacklist
    • Setup Customers from Back-Office
    • Customers File Upload
    • Setup Territories

    Customer Credit & Credit Settlement

    • Check Customer Credit from App
    • Settle Customer Credit
    • Customer Credit Reports

    Customer Cheques & Cheque Settlement

    • Customer Cheques View
    • Customer Cheque Lifecycle

    Customer Deposits

    • Accept Customer Deposit
    • Refunding Customer Deposit
  • Customer Dashboard

Suppliers

    Setup Suppliers

    • Setup Suppliers
    • Supplier File Upload

    Supplier Cheques & Cheque Settlement

    • Supplier Cheques View
    • Supplier Cheque Lifecycle
    • Issuing a Replacement Cheque

Inventory

    Manage Inventory from App

    • View Inventory from App
    • Print Inventory Snapshot
    • Add Inventory through App
    • Deduct Inventory through App
    • Print Labels in Bulk

    Manage Inventory from Back-Office

    • Inventory Snapshot Report
    • Inventory Movement Report
    • Inventory Transaction History
    • Individual Inventory Actions
    • Inventory File Upload

    Purchase Orders

    • Create Purchase Order
    • Actions on Purchase Orders

    Supplier Bills (GRN)

    • Create GRN
    • Actions on GRNs

    Stock Issuances (Transfers)

    • Create Stock Issuance
    • Actions on Stock Issuances

    Stock Takes

    • Add Stock Take
    • Actions on Stock Takes

    Supplier Returns

    • Create Stock Return
    • Actions on Supplier Returns

Inventory Transaction History

To view the History of Stock Transactions for a particular Item, click on the row for that Item in Inventory Snapshot. Then the “Item Inventory” screen will be displayed.

Back-Office -> Inventory Screen -> View Inventory Snapshot Report -> Click on a row to view hostory -> Inventory Transaction History

Back-Office Screenshot

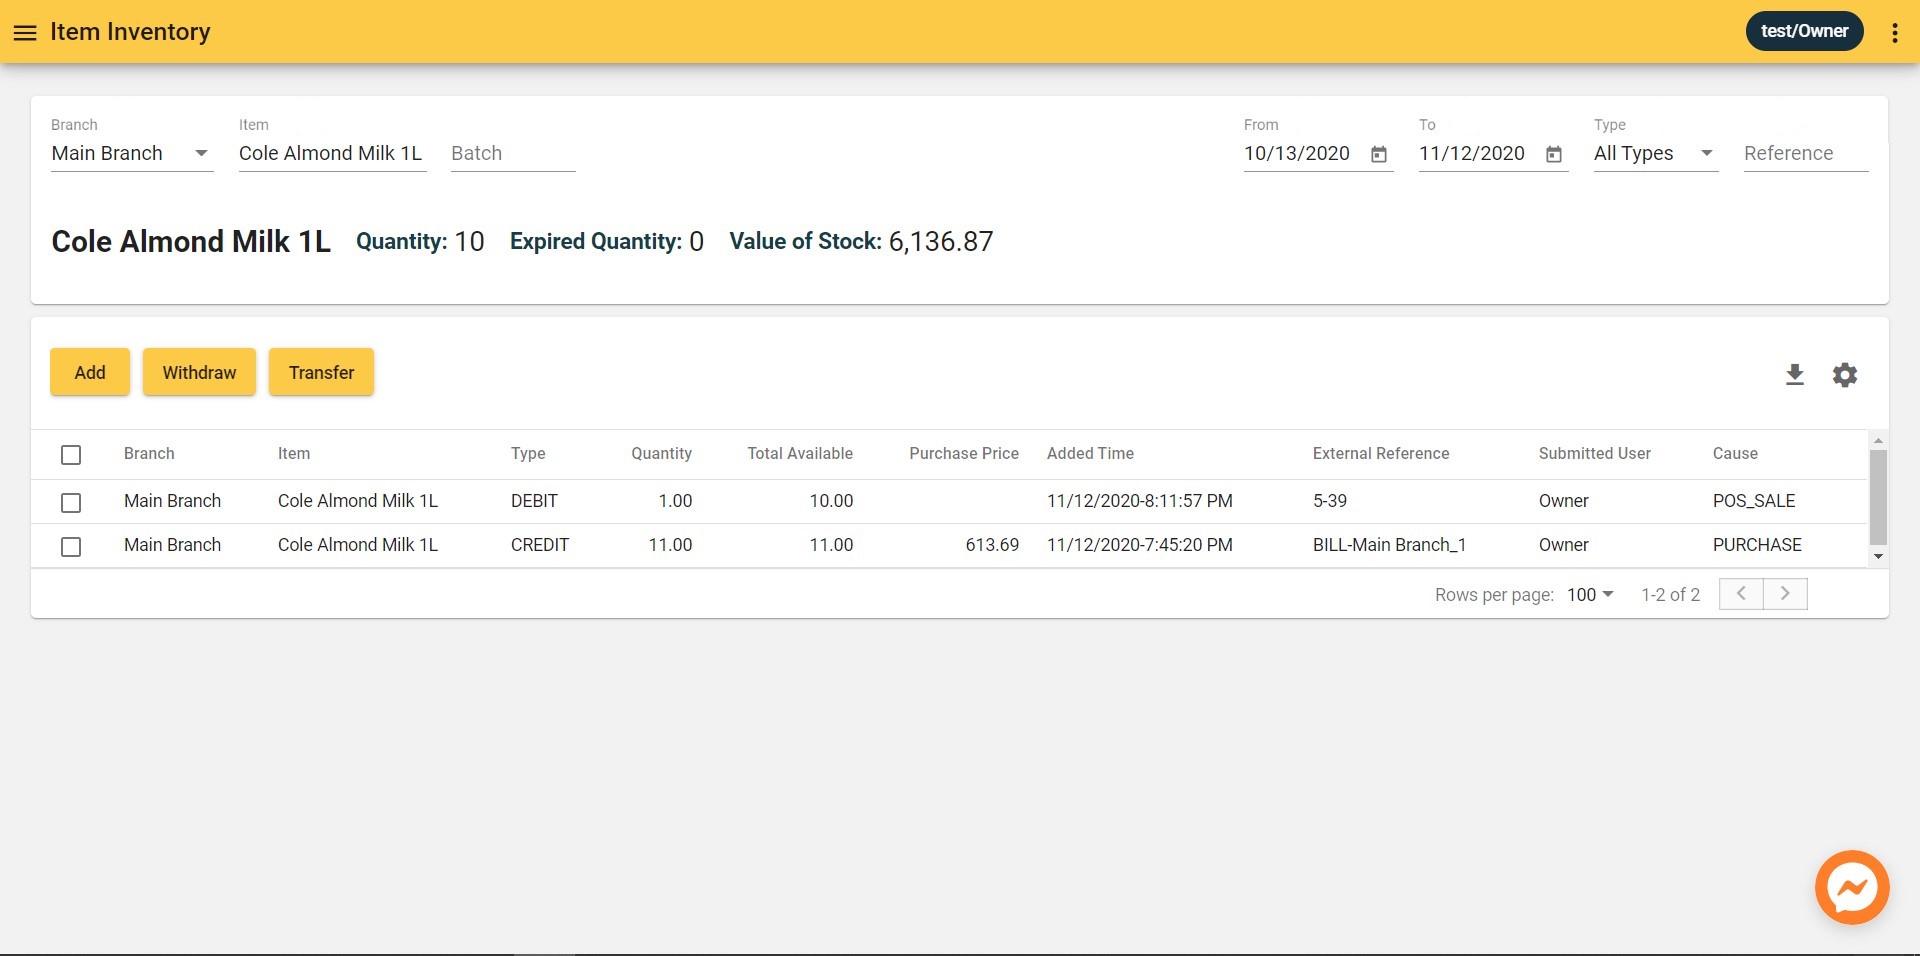
Each row in the Item Inventory screen refers to a stock Credit or Debit action.
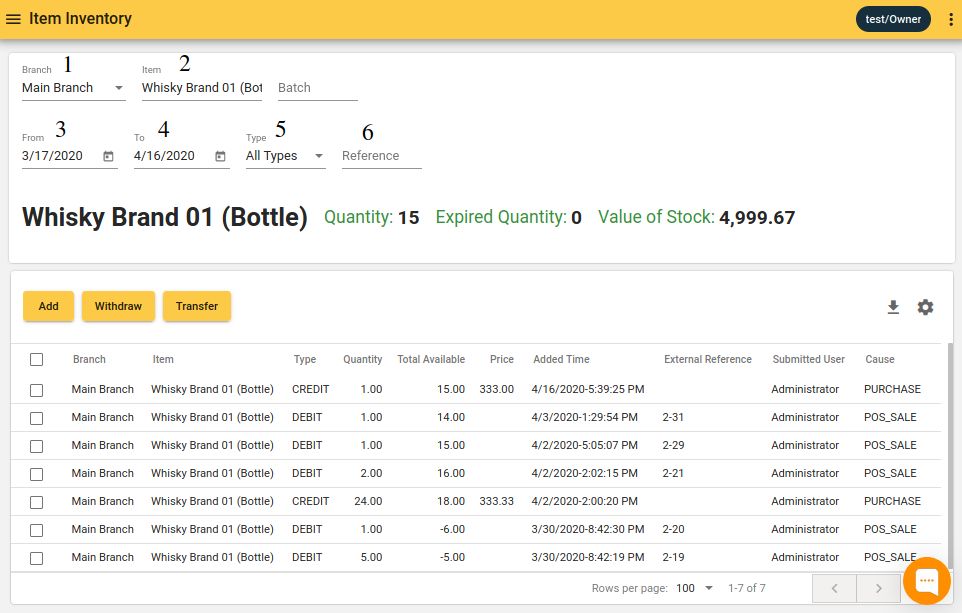
Filters Section

Back-Office Screenshot

NumberFilter NameDescription
1BranchStock Transactions of the chosen Item for the selected Branch is displayed in the list. Any Branch in the system can be selected. All Branches option can also be selected.
2ItemFor which Item the Stock Transactions are displayed in the list. Selected Items can be changed here. All Items can be selected - in case Stock Transactions of all Items are displayed in the order of Transaction Time.
3Date filter for Stock TransactionsStarting Date for the custom period.
4Date filter for Stock TransactionsEnd Date for the custom period.
5Stock Transaction TypeStock Transaction Types to be displayed. (All Types / Credit / Debit)
6ReferenceFilter by Reference (of Sales Bill, GRN, etc) related to stock transaction.

Data Table Section

Back-Office Screenshot

Colomn NameDescription
BranchSelf-explanatory
ItemSelf-explanatory
TypeStock Credit / Stock Debit
QuantityQuantity of the Transaction (Credit Quantity or Debit Quantity). Always shown as a positive number.
Total AvailableRemaining stock in the branch after transaction.
Purchase PriceCost Price of Item for the transaction.
Added TimeSelf-explanatory
External ReferenceReference Number of the original Transaction which caused the stock movement.
Submitted UserSelf-explanatory
CauseCause of the Transaction. One from a fixed set of reasons describing the original Transaction which caused the stock movement. Ex: POS_SALES, PURCHASE, etc

Inventory Transaction History Report can also be downloaded by clicking on the Download Arrow in the top right corner of the data table.

← Inventory Movement ReportIndividual Inventory Actions →
  • Filters Section
  • Data Table Section
SpicePOS User Guide

Links

www.spicepos.com
Back-Office

Follow Us

Facebook
Instagram
Copyright © 2021 SpicePOS